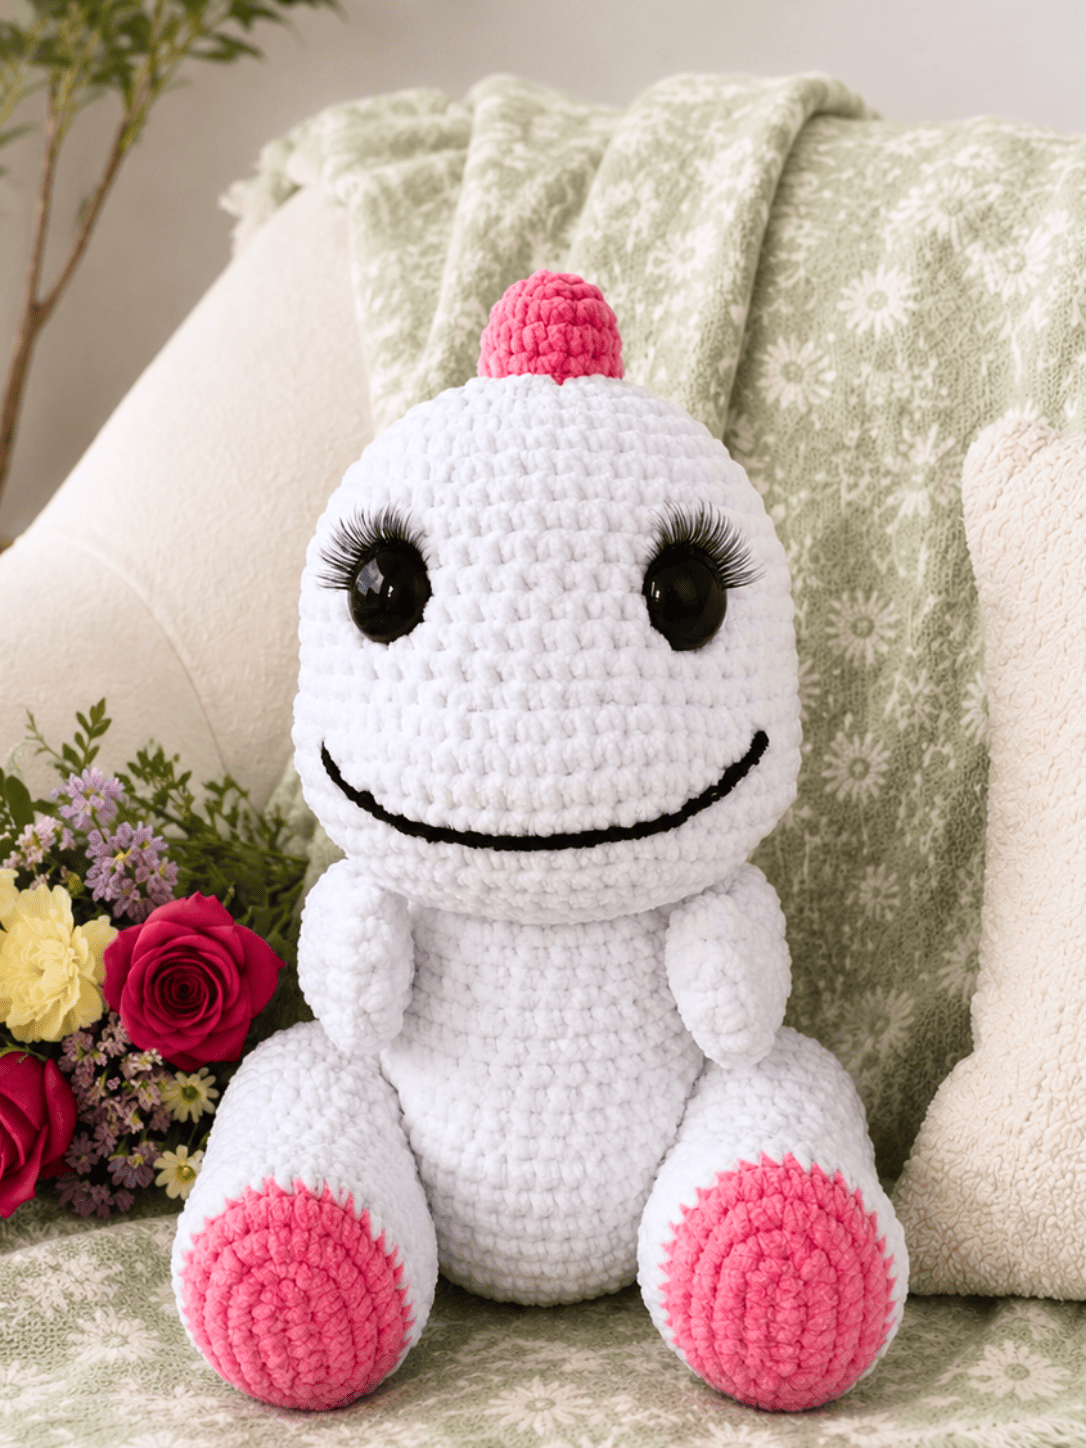
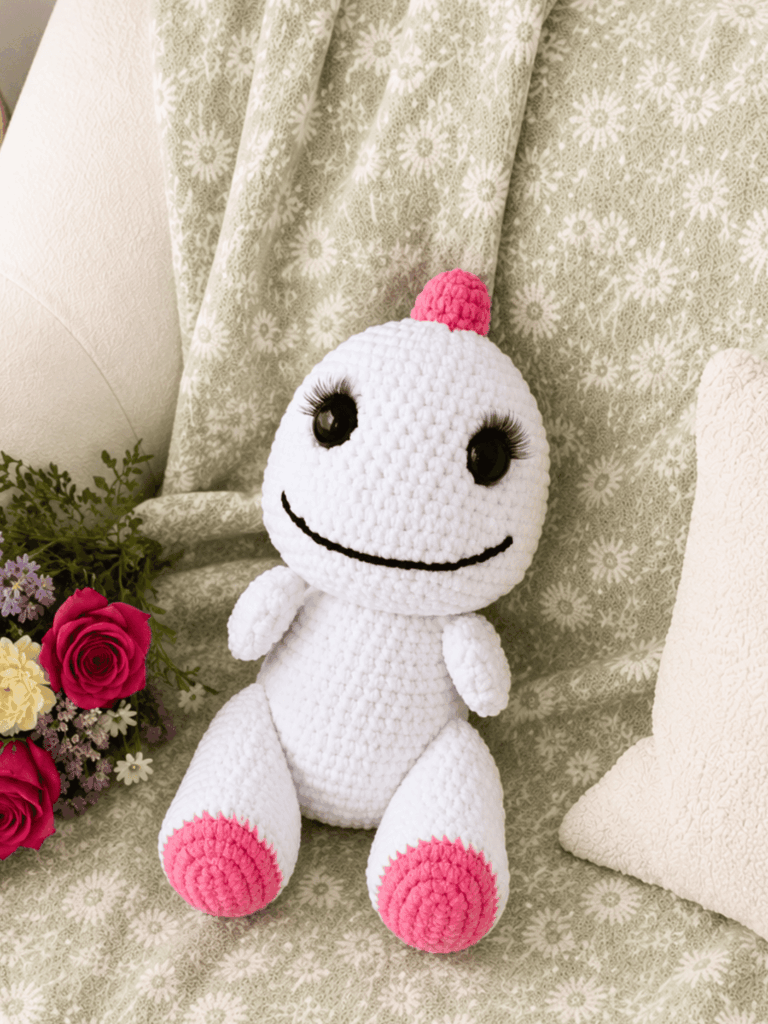
I used to think dragon amigurumi patterns were always difficult, but this Bigo Live Dragon feels soft, sweet, and very fun to make. The round white body, tiny sleepy eyes, pink back spikes, and little sitting pose give it such a cute marshmallow look. I love how gentle this dragon feels instead of scary.
This pattern is a lovely project if you enjoy plush amigurumi with soft shaping and small details. The body, head, arms, legs, tail, and six pink spikes are made separately, then joined together at the end. The light cinching around the hips and shoulders helps the dragon sit nicely on its own.
If you want to try a bigger crochet toy, this dragon is a beautiful choice. The finished size is about 30 cm tall, so it feels like a real cuddly handmade gift. The mix of round crochet pieces and simple flat rows gives the toy a special ribbed texture that makes it look extra soft and pillowy.
Materials Needed
- Yarn: Dolce YarnArt (or a similar plush yarn), White, approx. 1.5–2 skeins for the body, head, arms, and legs; Himalaya Dolphin Baby, Pink (or a similar plush yarn), approx. 0.5 skein for the leg tips and spikes
- Small amount of black yarn for the facial details
- Sturdy thread for cinching, such as white cotton yarn or a thinner cotton-blend yarn
- Safety eyes, 30 mm, 1 pair
- Hook size 5 mm
- White thread for securing the head in place
- Needle for sewing pieces together
- Row-start stitch markers
- Polyester fiberfill stuffing
Abbreviations Used
- MR = Magic Ring
- sc = Single Crochet
- ch = Chain
- dec = Decrease
- inc = Increase (2 sc in same stitch)
- offset st = a stitch worked slightly shifted from its usual position, used in the mixed technique to build the ribbed texture
- ( )x3 = repeat the instructions in parentheses three times
- (18) = total stitch count at the end of the row is given in parentheses
Pattern Notes
This pattern uses a mixed crochet technique that combines plain single crochet rounds with short, turned flat rows. Yarn usage and finished size both depend heavily on your gauge, your hook size, and which technique you use for the textured rows; toys worked in the mixed technique typically use more yarn and come out slightly smaller than the same toy worked in a checkmark stitch, since the mixed rows pack the stitches more densely.
Gauge isn’t critical to the construction itself, only to the final size, so match your tension to how snug you want your stitches to hold the stuffing in. Stitch counts are given at the end of each row in parentheses, and where a repeated group is written with an “x” (for example, “x6”), work that group that many times around.
Pattern Instructions
Body
- Row 1: 9 sc in MR. (9)
- Row 2: 9 inc. (18)
- Row 3: (2 sc, inc) x6. (24)
- Row 4: (3 sc, inc) x6. (30)
- Row 5: (4 sc, inc) x6. (36)
- Row 6: (5 sc, inc) x6. (42)
- Row 7: (6 sc, inc) x6. (48)
- Rows 8-13: sc around, 6 rows even. (48)
- Row 14: 12 sc, dec, (2 sc, dec) x5, 14 sc. (42)
- Rows 15-16: sc around, 2 rows even. (42)
- Row 17: (5 sc, dec) x6. (36)
- Rows 18-20: sc around, 3 rows even. (36)
- Row 21: 12 sc, dec, 3 sc, dec, 3 sc, dec, 12 sc. (33)
- Row 22: sc around. (33)
- Row 23: 2 sc, dec, 23 sc, dec, 2 sc, dec. (30)
- Rows 24-25: sc around, 2 rows even. (30)
On Row 14, make sure the six increases land evenly across the front of the belly; they’re what shape the belly’s curve, so keep the spacing exact. Stuff the body, but not rock hard, since you’ll need to cinch it later when attaching the arms and legs.
Arms (make 2)
- Row 1: ch 5, starting in the 2nd chain from the hook work 3 sc, 2 sc in the last stitch, turn, 3 sc. (8)
- Row 2: inc, 2 sc, 2 inc, 2 sc, inc. (12)
- Row 3: inc, 4 sc, 2 inc, 4 sc, inc. (16)
- Row 4: sc around. (16)
- Center your marker at the midpoint of the row.
- Row 5: 6 sc, dec, 1 sc, dec, 5 sc. (14)
- Row 6: 5 sc, 2 dec, 4 sc. (12)
- Row 7: sc around. (12)
- Row 8: 1 sc, dec, 2 sc, inc, 1 sc, inc, 2 sc, dec. (12)
- Rows 9-11: sc around, 3 rows even. (12)
- Stuff the arm lightly, keeping the wrist area soft so you can shape the fingers later.
- Row 12: 6 dec, close the remaining stitches with the needle. (6)
Legs (make 2)
Begin with pink yarn.
- Row 1: ch 7, starting in the 2nd chain from the hook work 5 sc, 3 sc in the last stitch, turn, 4 sc, inc. (14)
- Row 2: inc, 4 sc, 3 inc, 4 sc, 2 inc. (20)
- Row 3: 2 inc, 5 sc, 4 inc, 7 sc, 2 inc. (28)
- Row 4: 4 sc, inc, 2 sc, inc, 10 sc, inc, 2 sc, inc, 6 sc. (32)
- Row 5: switch to white yarn, sc around. (32)
- Row 6: 10 sc, dec, 2 sc, dec, 2 sc, dec, 12 sc. (29)
- Row 7: sc around. (29)
- Row 8: 9 sc, dec, 1 sc, dec, 1 sc, dec, 1 sc, dec. (26)
- Rows 9-11: sc around, 3 rows even. (26)
- Row 12: 2 sc, dec, 8 sc, inc, 2 sc, inc, 7 sc, dec. (26)
- Rows 13-16: sc around, 4 rows even. (26)
- Row 17: 1 sc, dec, 21 sc, dec. (24)
- Stuff the leg firmly.
- Row 18: (2 sc, dec) x6. (18)
- Row 19: (1 sc, dec) x6. (12)
- Row 20: 6 dec, close the remaining stitches with the needle.
Tail
- Row 1: 6 sc in MR. (6)
- Row 2: (1 sc, inc) x3. (9)
- Row 3: sc around. (9)
- Row 4: (2 sc, inc) x3. (12)
- Row 5: (3 sc, inc) x3. (15)
- Row 6: 4 sc, inc, 2 sc, inc, 2 sc, inc, 4 sc. (18)
- Row 7: 6 sc, inc, 2 sc, inc, 2 sc, inc, 6 sc. (21)
- Row 8: 7 sc, inc, 2 sc, inc, 2 sc, inc, 7 sc. (24)
- Rows 9-10: sc around, 2 rows even. (24)
- Row 11: (3 sc, inc) x6. (30)
- Row 12: sc around. (30)
- Row 13: inc, 2 sc, inc, 23 sc, inc, 2 sc. (33)
- Row 14: (10 sc, inc) x3. (36)
- Row 15: 9 sc, (inc, 2 sc) x6, 10 sc. (42)
Stuff the tail firmly enough that it holds its shape well, and add a bit more stuffing once you sew it onto the body.
Head
- Row 1: 9 sc in MR. (9)
- Row 2: 9 inc. (18)
- Row 3: (1 sc, inc) x9. (27)
- Row 4: sc around. (27)
- Row 5: (2 sc, inc) x9. (36)
- Row 6: sc around. (36)
- Row 7: (5 sc, inc) x6. (42)
- Row 8: (6 sc, inc) x6. (48)
- Rows 9-15: sc around, 7 rows even. (48)
- Row 16: (7 sc, inc) x6. (54)
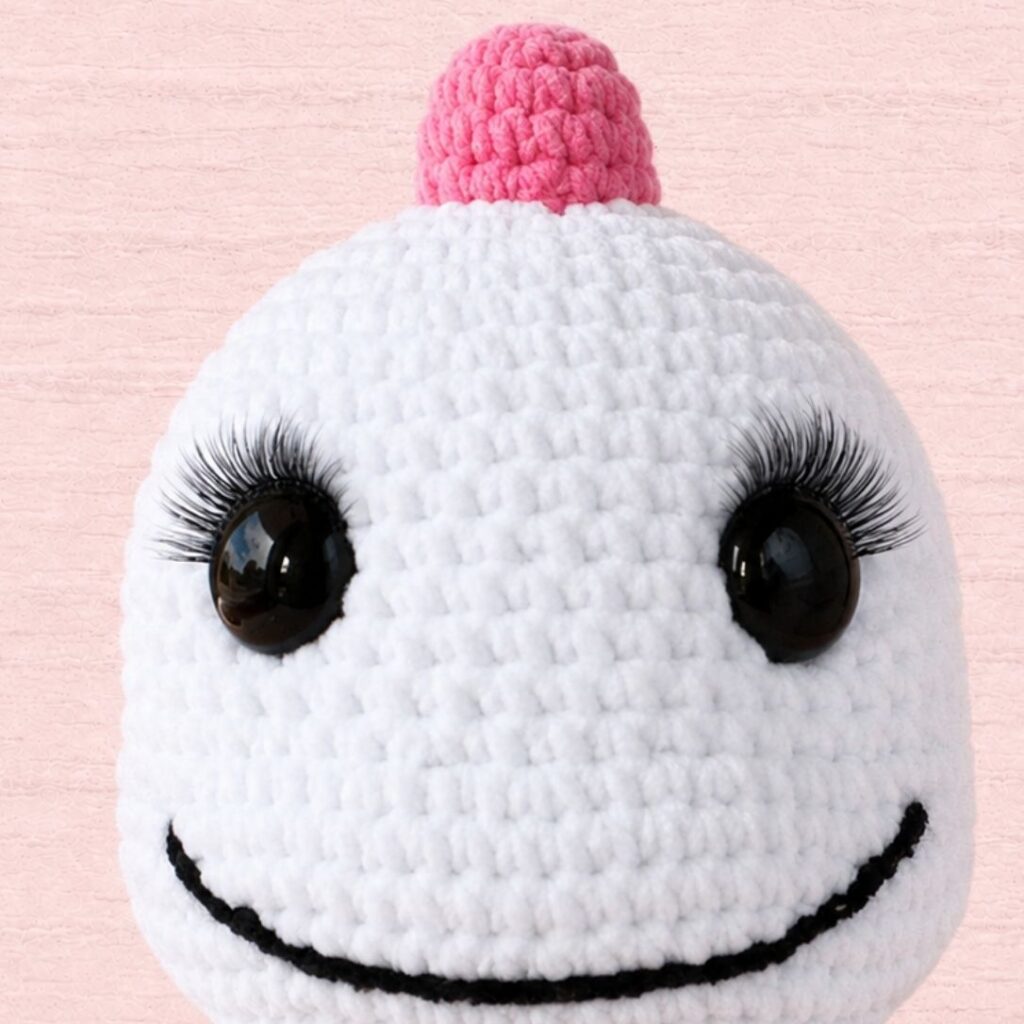
- Insert the safety eyes here, before continuing.
- Row 17: 13 sc, (inc, 2 sc) x8, inc. (63)
- Row 18: dec, 3 sc, dec, 51 sc, dec, 3 sc. (60)
- Rows 19-20: sc around, 2 rows even. (60)
- Row 21: (8 sc, dec) x6. (54)
- Row 22: (7 sc, dec) x6. (48)
- Row 23: (6 sc, dec) x6. (42)
- Stuff the head firmly.
- Row 24: (5 sc, dec) x6. (36)
- Row 25: (4 sc, dec) x6. (30)
- Row 26: (3 sc, dec) x6. (24)
- Row 27: (2 sc, dec) x6. (18)
- Row 28: (1 sc, dec) x6. (12)
- Row 29: 6 dec, close the remaining stitches with the needle. (6)
The eyes sit between Rows 12 and 13. Place a marker at the center of the face, count 4 stitches out to each side, and insert an eye into the 5th stitch on the left and right. If you’re using eyes with lashes attached, glue the lashes on ahead of time, ideally a couple of hours before you need them, so the glue is fully set.
Spikes (make 6, in graduated sizes)
Spike 1
- Row 1: 4 sc in MR. (4)
- Row 2: 4 inc. (8)
- Rows 3-4: sc around, 2 rows even. (8)
Spike 2
- Row 1: 6 sc in MR. (6)
- Row 2: 6 inc. (12)
- Rows 3-4: sc around, 2 rows even. (12)
Spike 3
- Row 1: 7 sc in MR. (7)
- Row 2: 7 inc. (14)
- Rows 3-4: sc around, 2 rows even. (14)
Spikes 4 and 5 (make 2, identical)
- Row 1: ch 5, starting in the 2nd chain from the hook work 3 sc, 3 sc in the last stitch, turn, 2 sc, inc. (7)
- Row 2: inc, 3 sc, inc, 3 sc, inc. (12)
- Row 3: inc, 5 sc, 2 inc, 5 sc, inc. (16)
Spike 6
- Row 1: ch 5, starting in the 2nd chain from the hook work 3 sc, 3 sc in the last stitch, turn, 2 sc, inc. (7)
- Row 2: inc, 3 sc, inc, 3 sc, inc. (12)
- Row 3: inc, 5 sc, 2 inc, 5 sc, inc. (16)
- Row 4: sc around. (16)
It’s easiest to sew the spikes on last, after every other piece is already attached, and don’t forget to stuff each one lightly before sewing it closed.
Assembly
Stuff the body and cinch it at the hip and shoulder points. Hold the legs up against the body so it can sit balanced and upright, then, at the spot where each leg meets the body, stitch through with thread and pull it snug so a soft indentation forms at the hip. Do the same with the arms: hold each one against the body, mark the point of contact, and cinch a matching indentation there.
Once the cinching is done, hold each leg against the body again and sew the two together along the line where they touch, picking up a stitch on the leg and the matching stitch on the body directly opposite it. Attach the arms the same way, sewing along their contact line with the body.
Sew on the six spikes down the back of the head and body, following the graduated sizes from smallest near the tail to largest near the head, stuffing each lightly as you close it. Finish by embroidering the mouth in black yarn or floss, and the dragon is complete.
Tips & Tricks
Keep an eye on your row counts through the mixed-technique sections; because this pattern alternates between rounds worked evenly and rows with shaping built in, it’s easy to lose track of which row you’re on if you set the piece down mid-section. A quick habit of counting stitches at the end of every row, especially through the increase and decrease rows on the head and legs, will save you from unpicking rows later.
Don’t skip the cinching step before you sew the arms and legs on. It’s a small bit of extra sewing, but it’s what gives the finished dragon its ability to sit upright with defined hips and shoulders instead of looking like a soft, shapeless blob once it’s stuffed.
When you switch from pink to white partway through the legs, weave in your ends as you go rather than leaving them all for the end; it’s much easier to keep track of a handful of tails on an unfinished piece than to hunt through a fully stuffed and sewn leg later.
For the spikes, resist the urge to overstuff. A light fill keeps them soft and slightly flexible, which looks much more natural running down a curved back than a row of hard, stiff bumps would.
Frequently Asked Questions
Can I skip the safety eyes and embroider the eyes instead?
Yes. You can embroider the eyes with black yarn or embroidery floss instead of using safety eyes. This is also a useful alternative when you prefer a completely soft facial finish.
What does the mixed technique actually look like compared to a plain stitch?
The mixed technique creates a denser and more textured surface than straightforward single crochet. In this pattern, that texture contributes to the dragon’s soft, ribbed, plush appearance.
Why is my belly on the body piece not curving the way it should?
Check the shaping and stitch placement carefully around Row 14. Keeping the shaping stitches evenly positioned across the front of the belly and maintaining the correct stitch count helps produce the intended curve.
Conclusion
That’s a complete little dragon: round white body, soft pink spikes marching down its back, sleepy lashed eyes, and a shy closed-mouth smile. The mixed technique takes a little more patience than a straightforward single crochet toy, but the ribbed texture it leaves behind is what gives this one its signature plush, marshmallowy look.
